Using PlayCanvas with MassiveRealm
PlayCanvas is a popular open-source 3D game engine for the web.
You can use MassiveRealm with PlayCanvas to create multiplayer games.
Getting started
Check out our Quick Start Guide to create a new MassiveRealm project and get your API key.
Prerequisites:
- Create a new MassiveRealm project.
- Your project's URL and Public Key will be sent to your email.
- Create Logic entry.
- Create Room entry with alias
game.
MassiveRealm Server Setup
This demo demonstrates multiplayer implementation with MassiveRealm.
Try the demo:
https://playcanv.as/p/jgHYeDcY/
Client-side source code:
https://playcanvas.com/project/1204880/overview/multiplayer-with-massiverealm
Server-side:
https://console.massiverealm.com/account/project/4094-e43c-4dbf
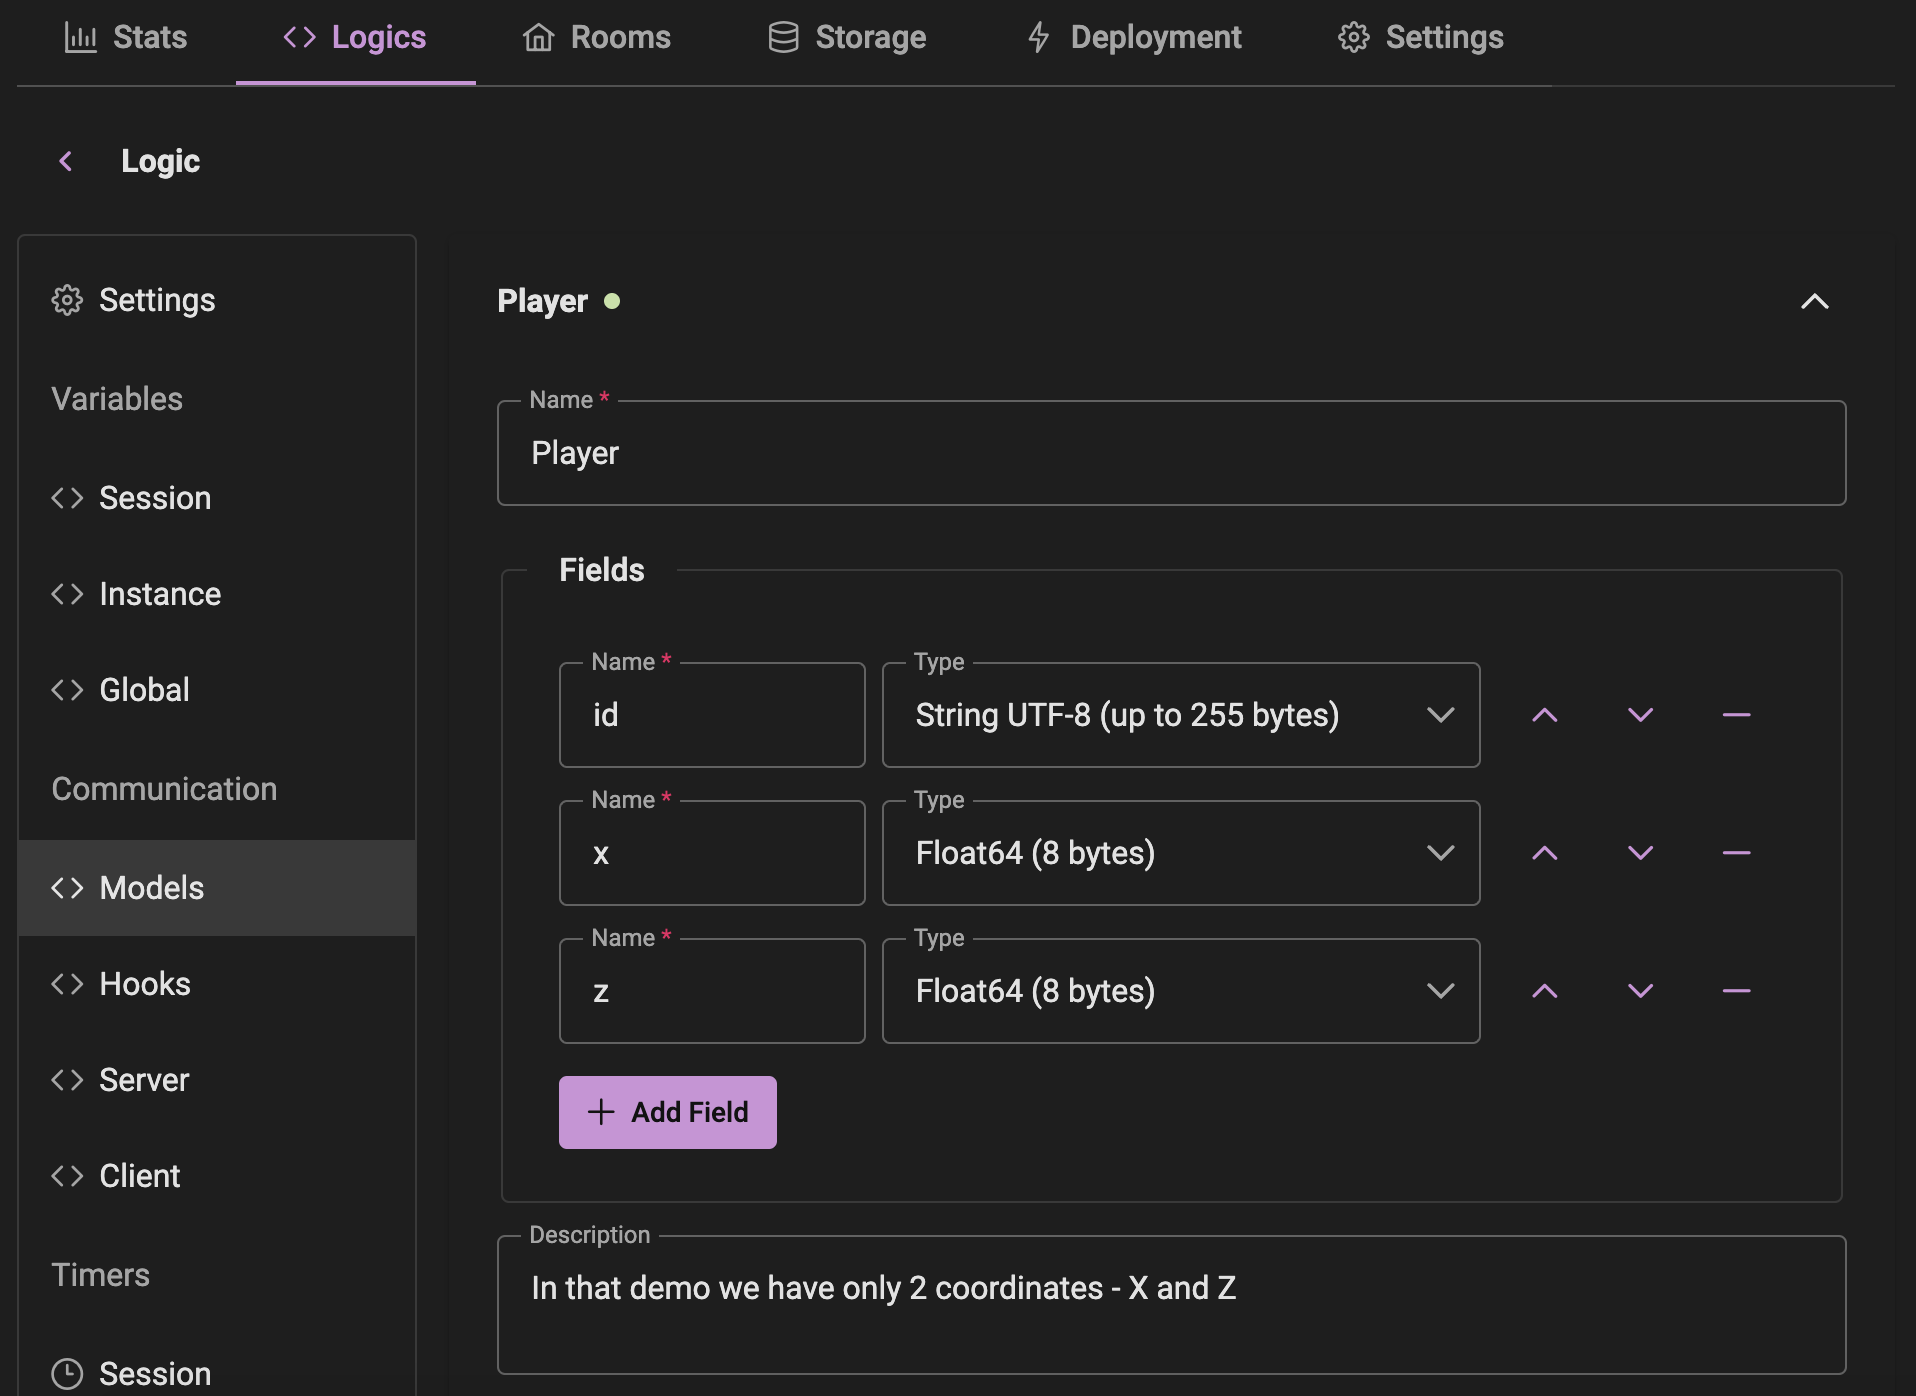
Step 1: Create Model
Navigate to the Communication > Models section in your project's logic and create a new model called Player with the following fields:
id - Stringx - Float64y - Float64
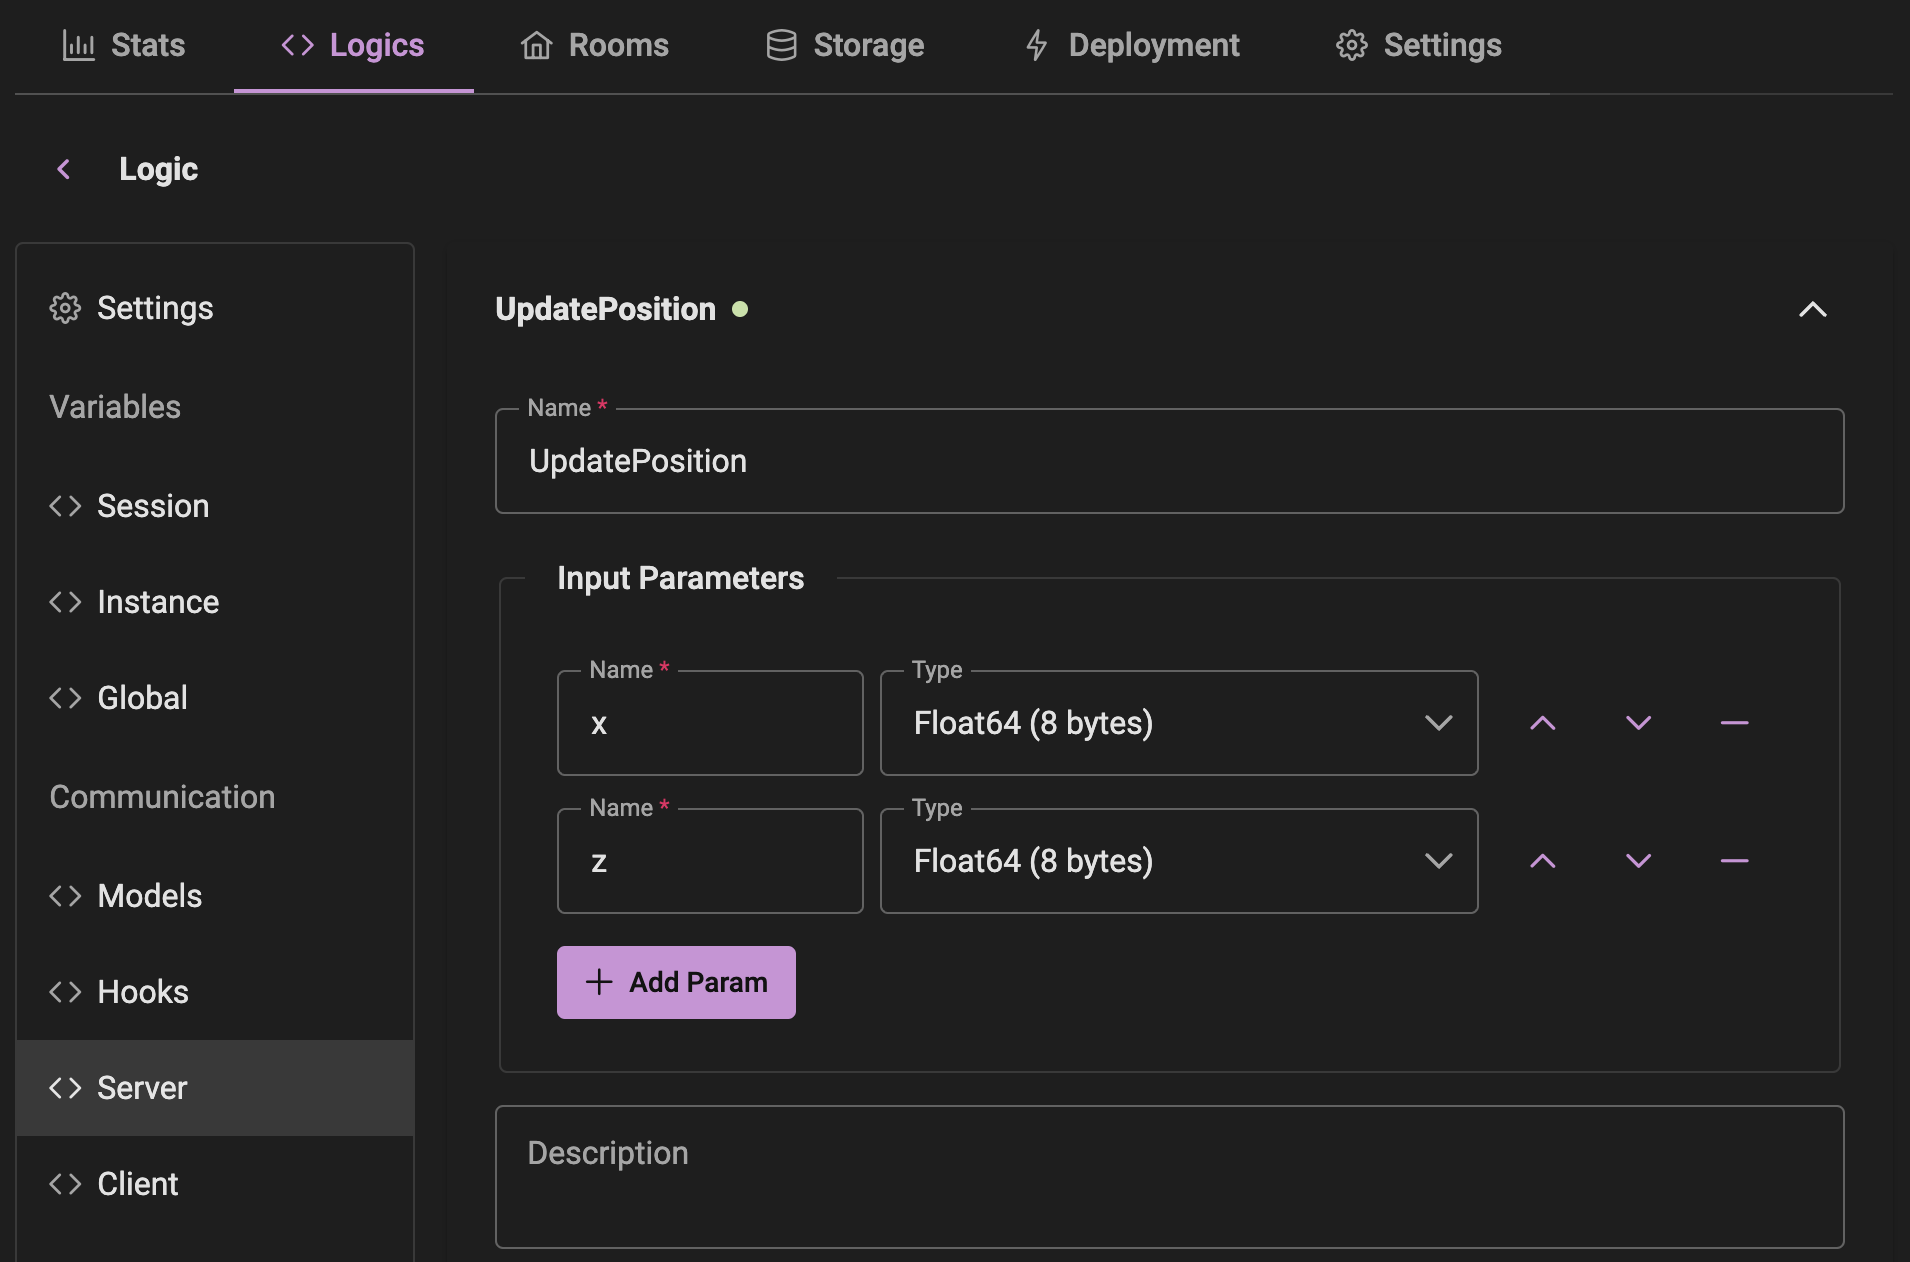
Step 2: Create Server Command
Navigate to the Communication > Server section in your project's logic.
Create a new command called UpdatePosition with the following input parameters:
x - Float64z - Float64
This command will be called by the client to update the player's position.
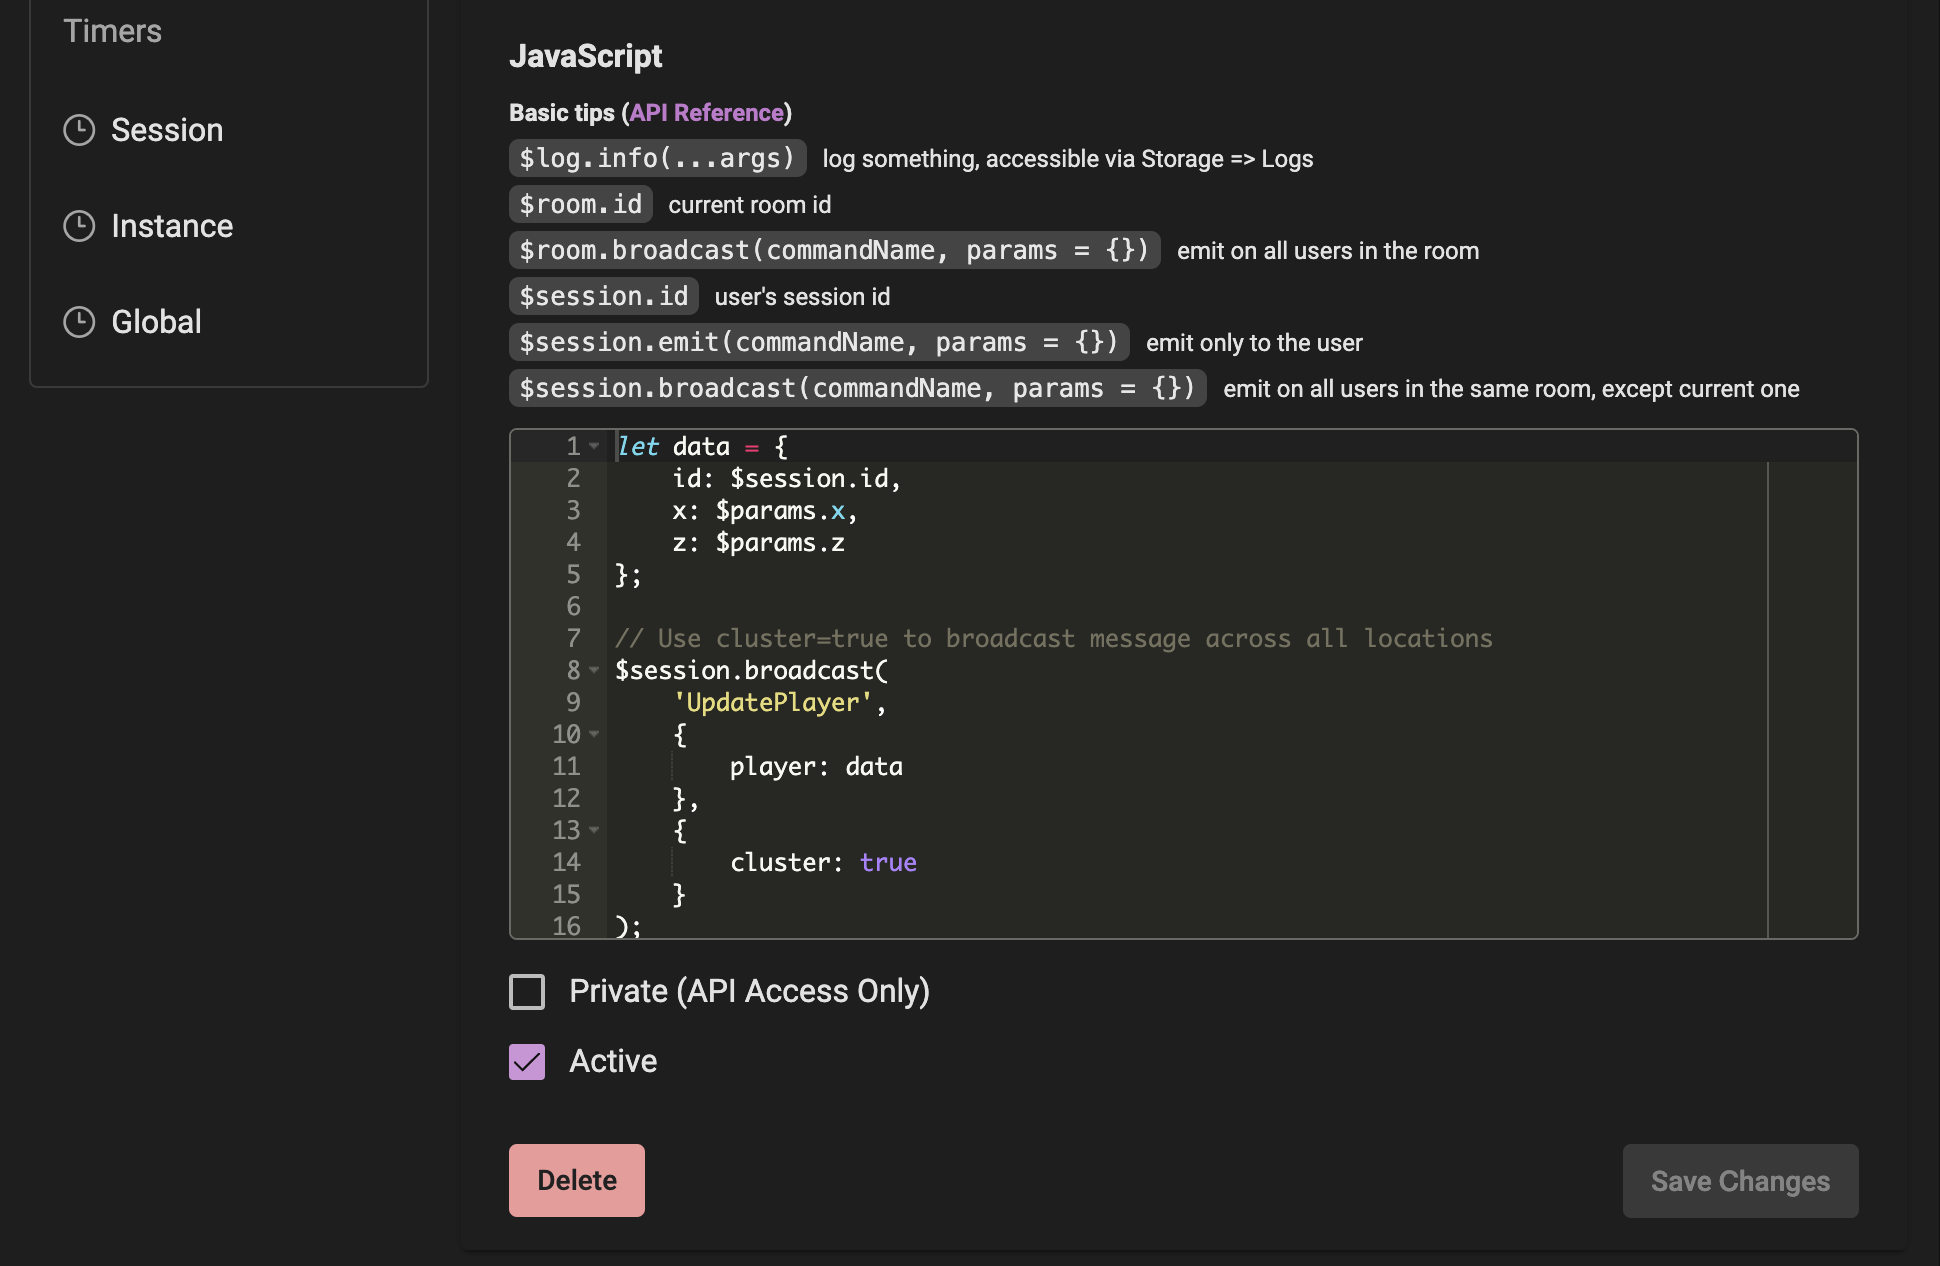
Add the following code to broadcast the player's position to all clients.
We're using cluster: true to broadcast the message across all locations in the Massive Cluster
let data = {
    id: $session.id,
    x: $params.x,
    z: $params.z
};

// Use cluster=true to broadcast message across all locations
$session.broadcast(
    'UpdatePlayer',
    {
        player: data
    },
    {
        cluster: true
    }
);
Step 3: Create Client Commands
Navigate to the Communication > Client section in your project's logic. Here we will create 2 commands:
Command 1: UpdatePlayers
Input Parameters:
players - Type: "Model: Player"
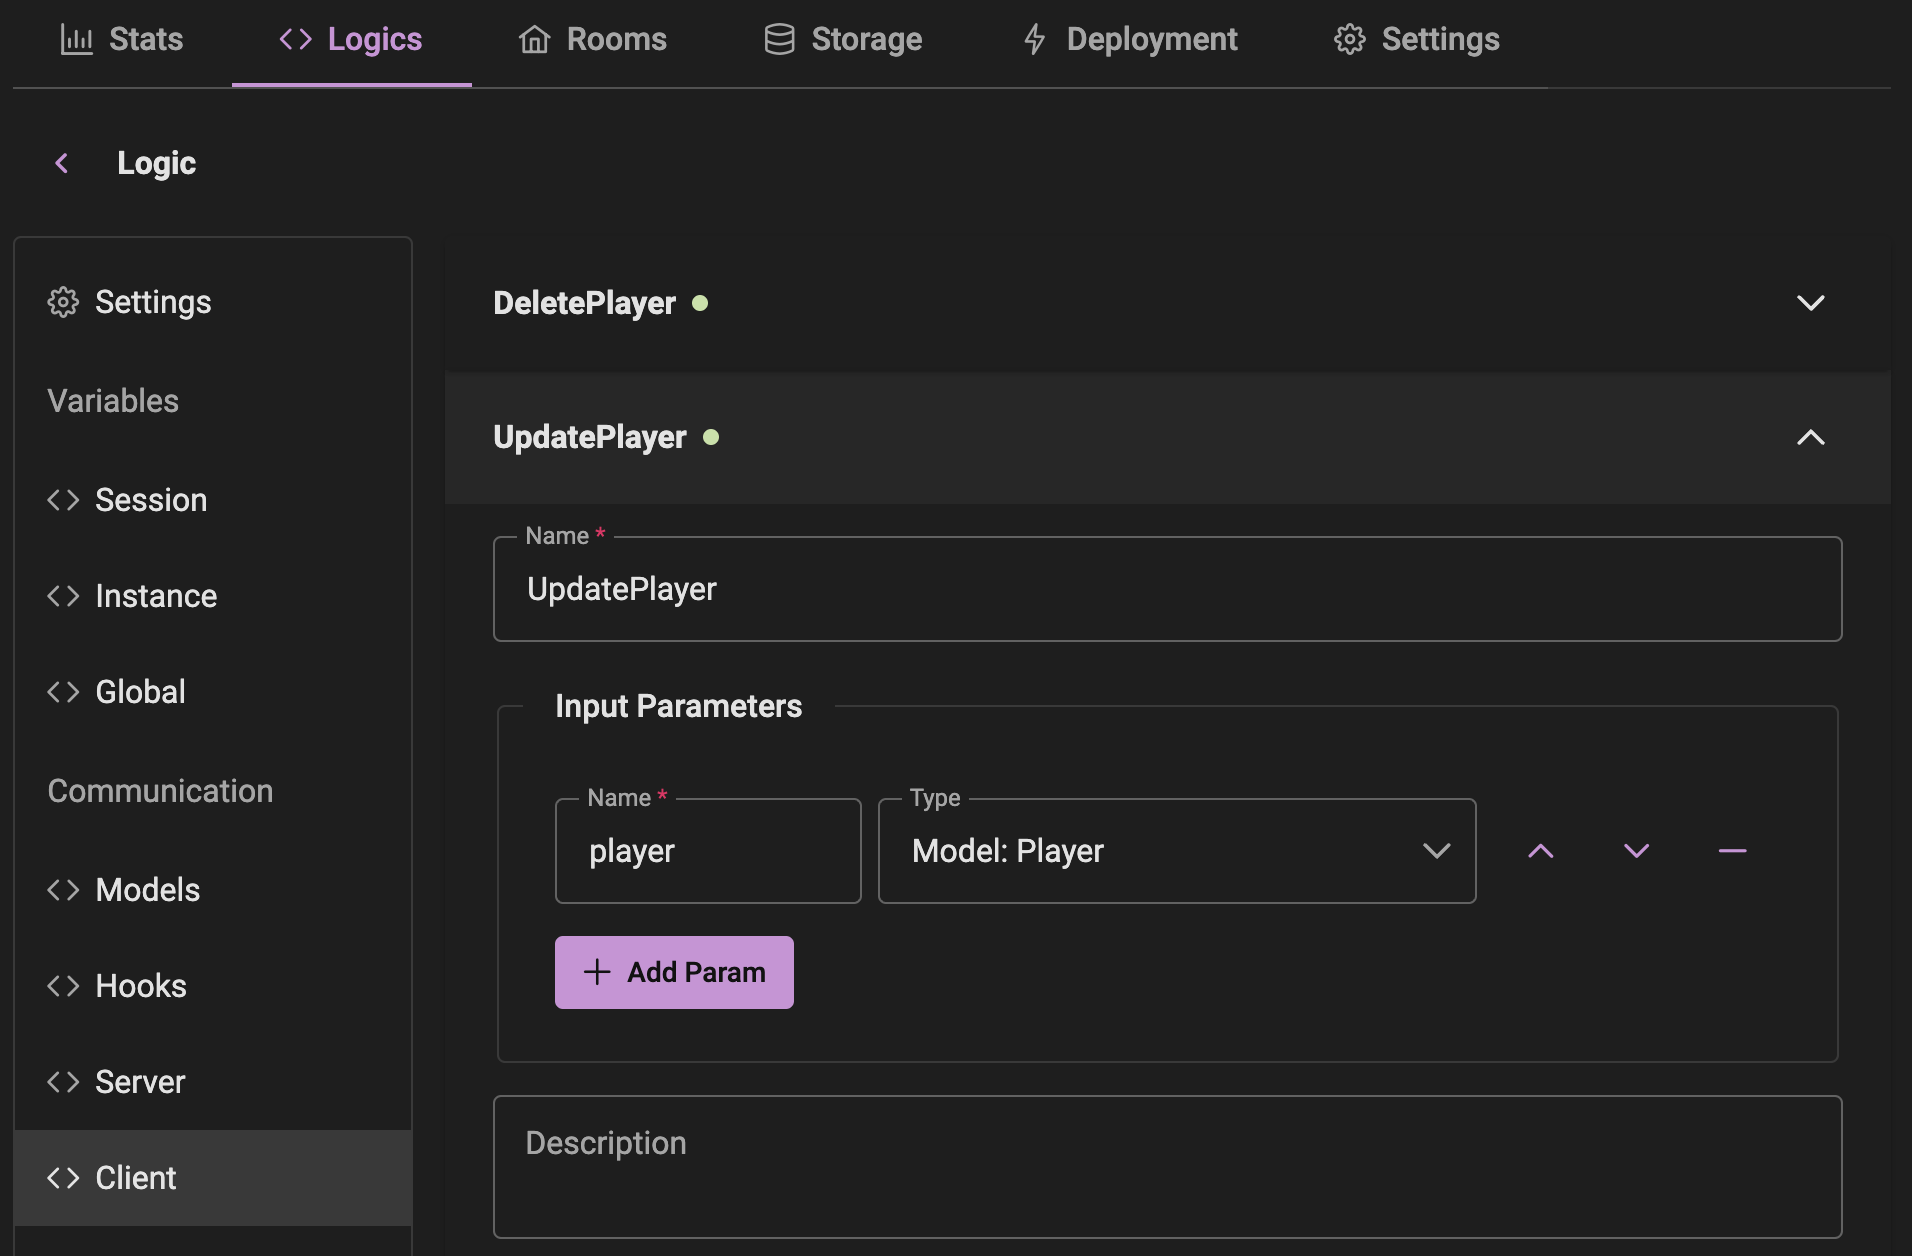
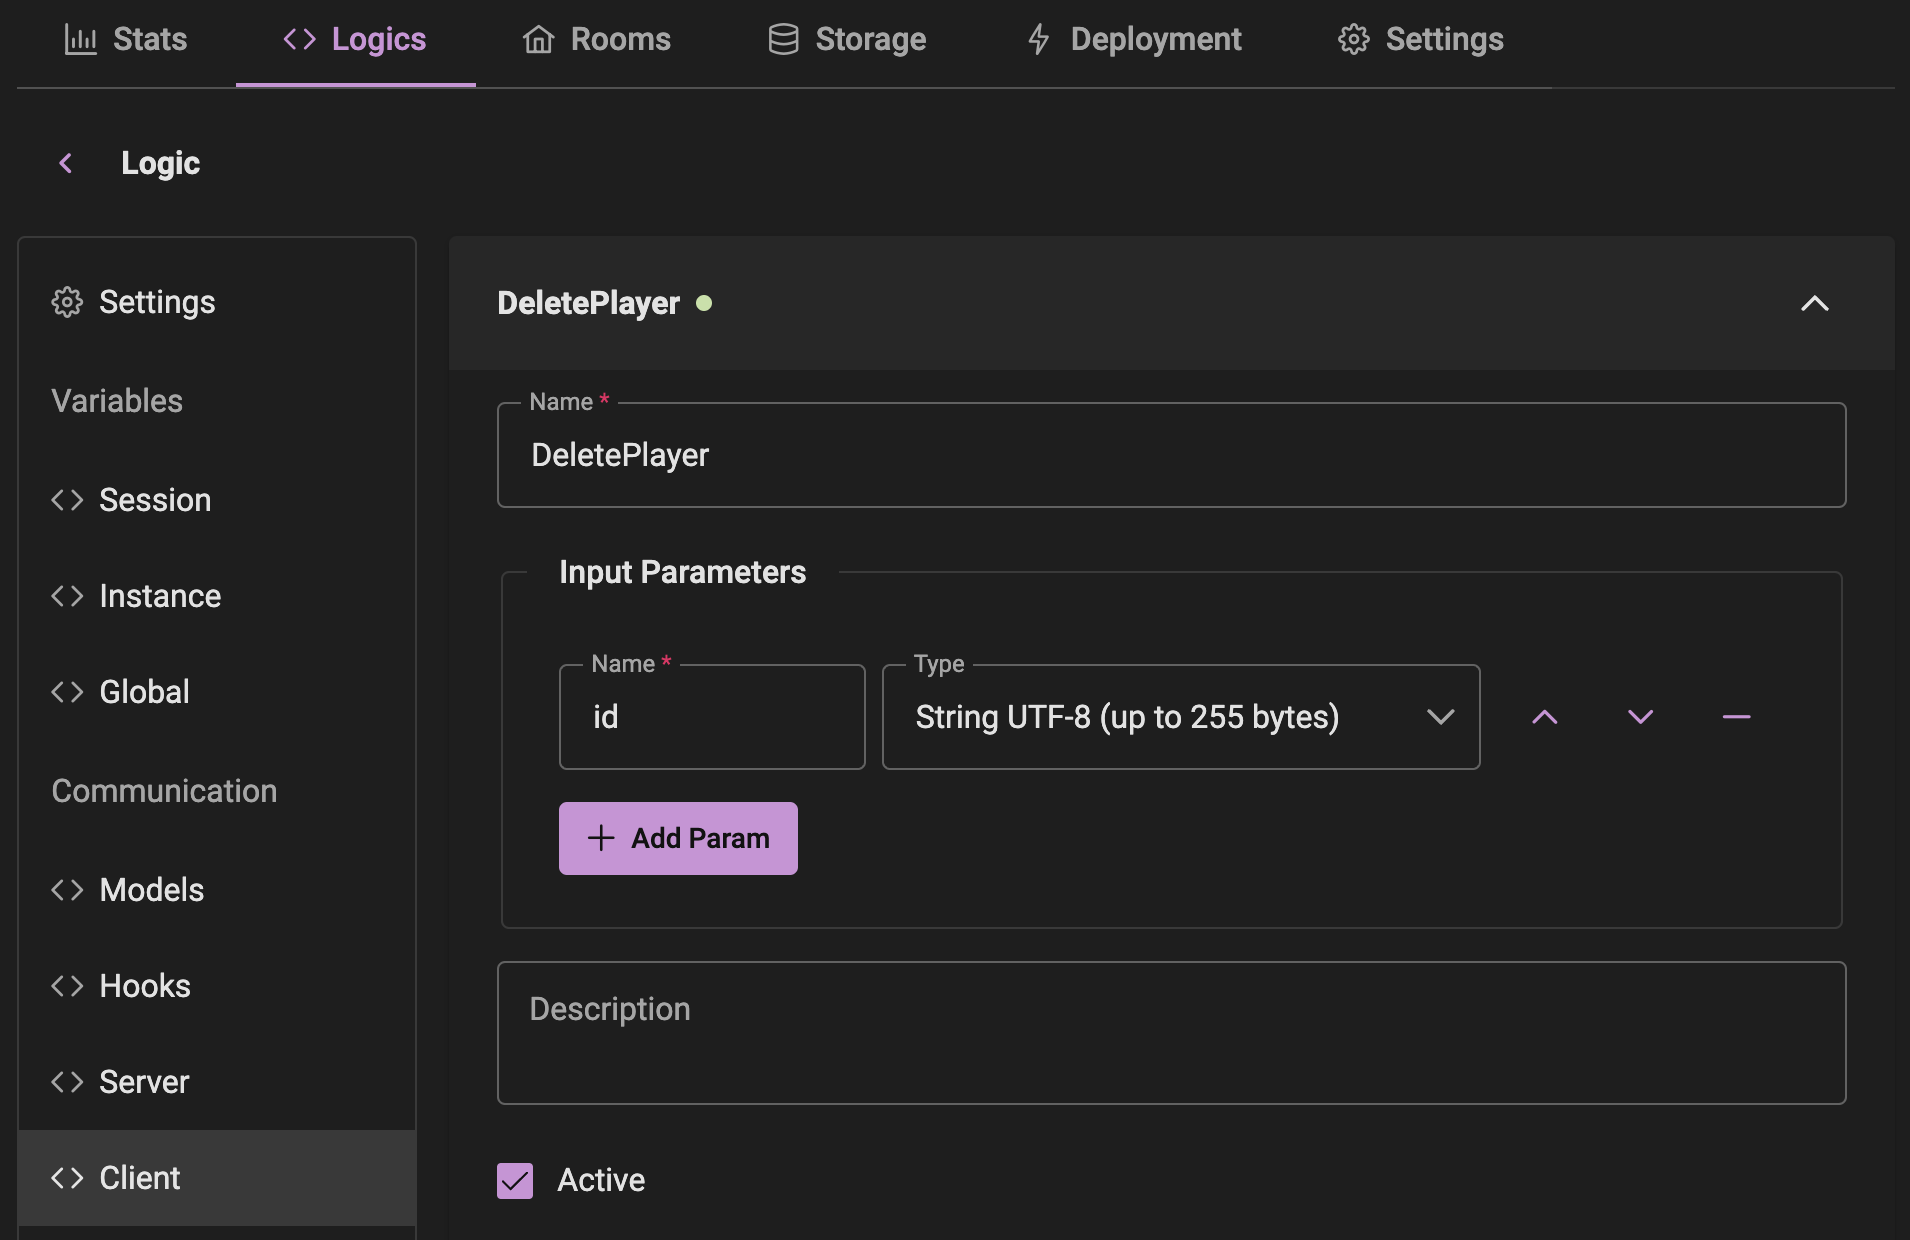
Command 2: DeletePlayer
Input Parameters:
id - String
Step 4: Hooks
Navigate to the Communication > Hooks section in your project's logic.
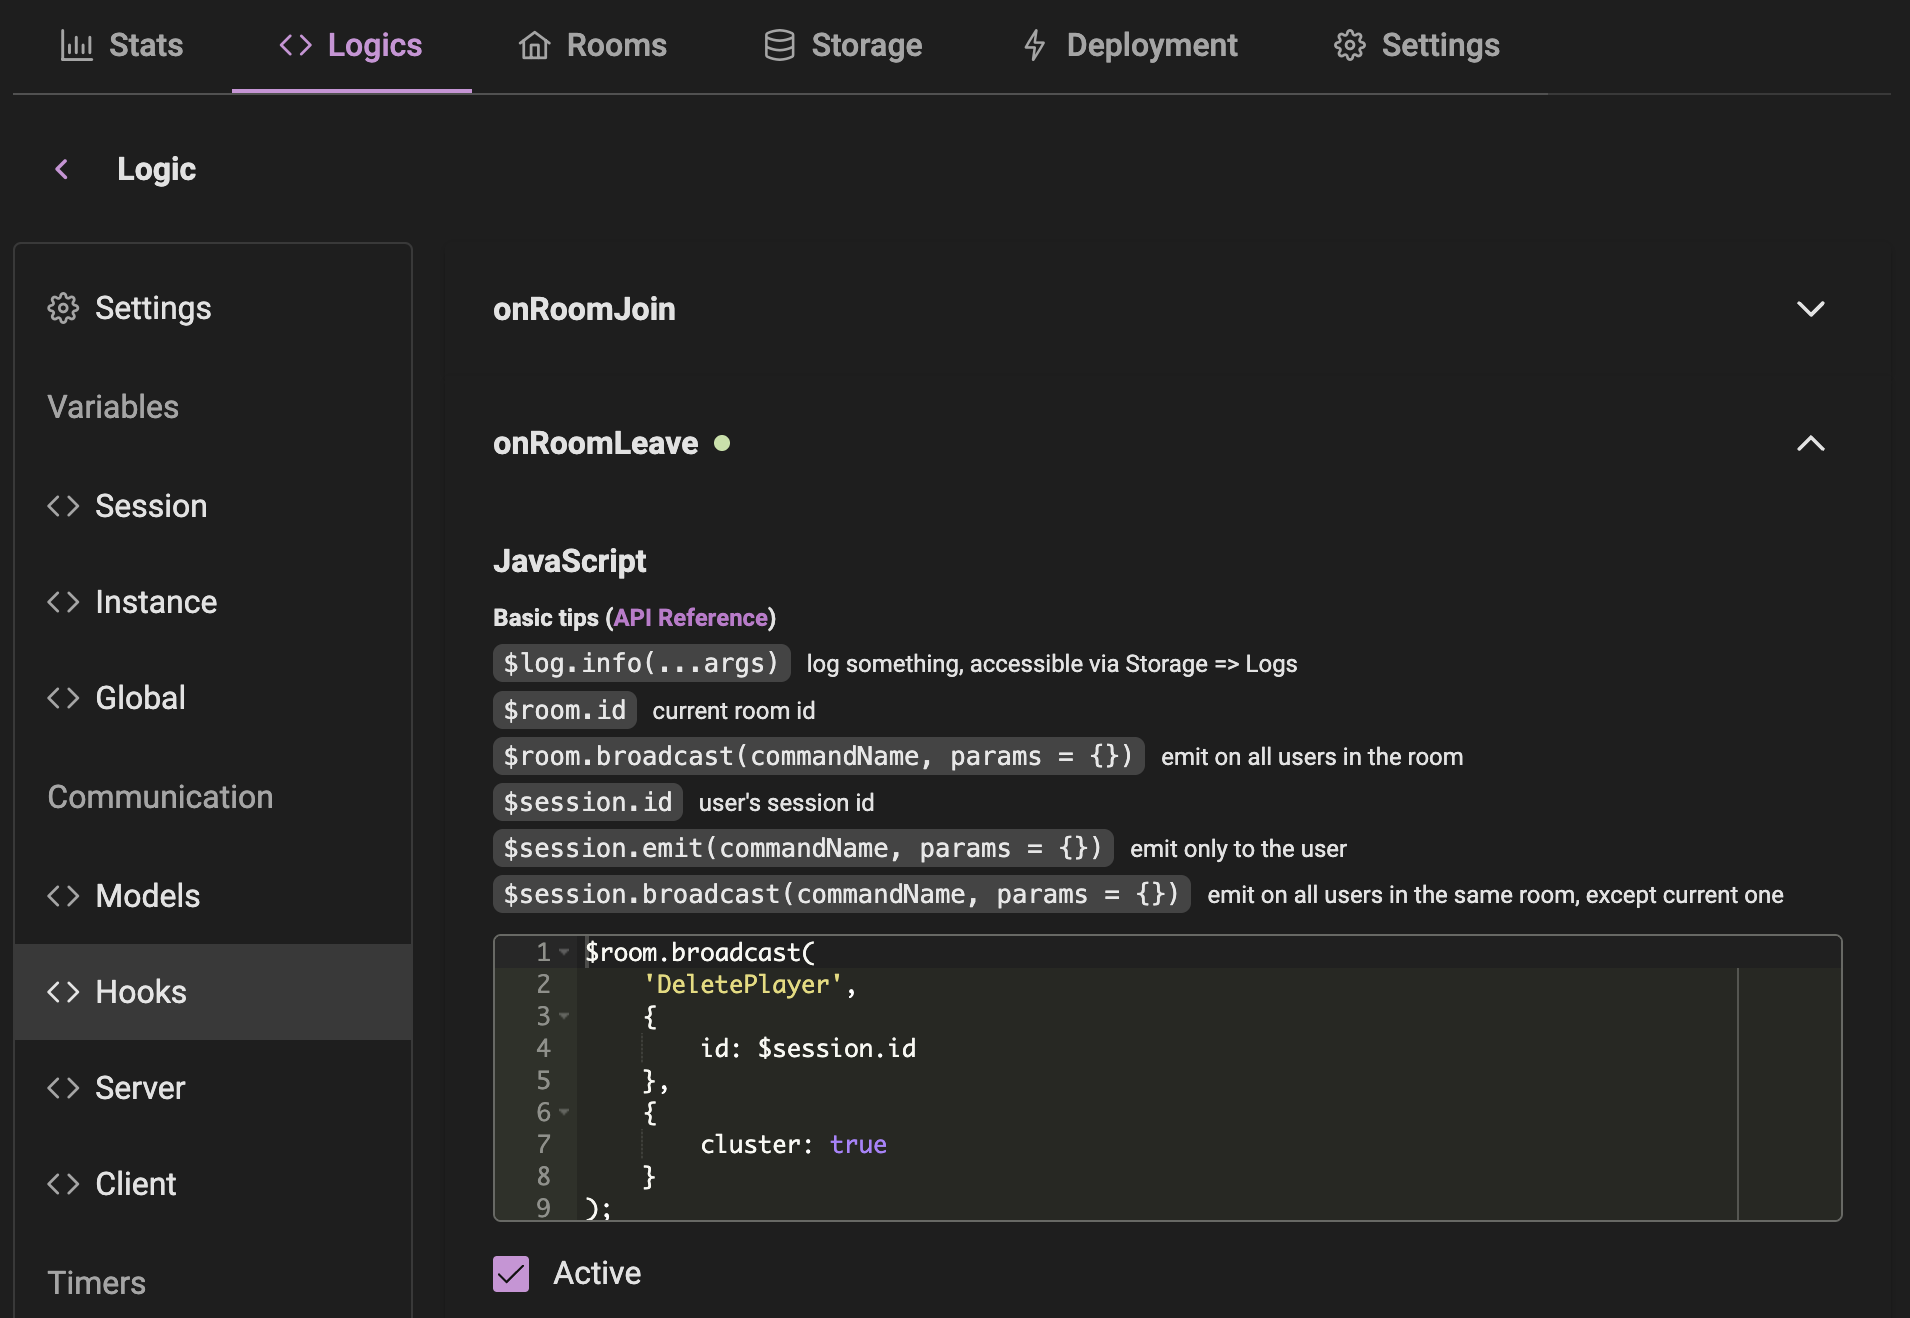
Hook 1: OnRoomLeave
Broadcast a message to all clients when a player leaves the room.
We're using cluster: true to broadcast the message across all locations in the Massive Cluster
$room.broadcast(
    'DeletePlayer',
    {
        id: $session.id
    },
    {
        cluster: true
    }
);
PlayCanvas Client Setup
Connect MassiveRealm Script
- Open your PlayCanvas project.
- Click on the
Settingstab. - Click on the
External Scriptstab. - Add the following script URL:
https://cdn.massiverealm.com/js/v1/client-browser.js
Like this: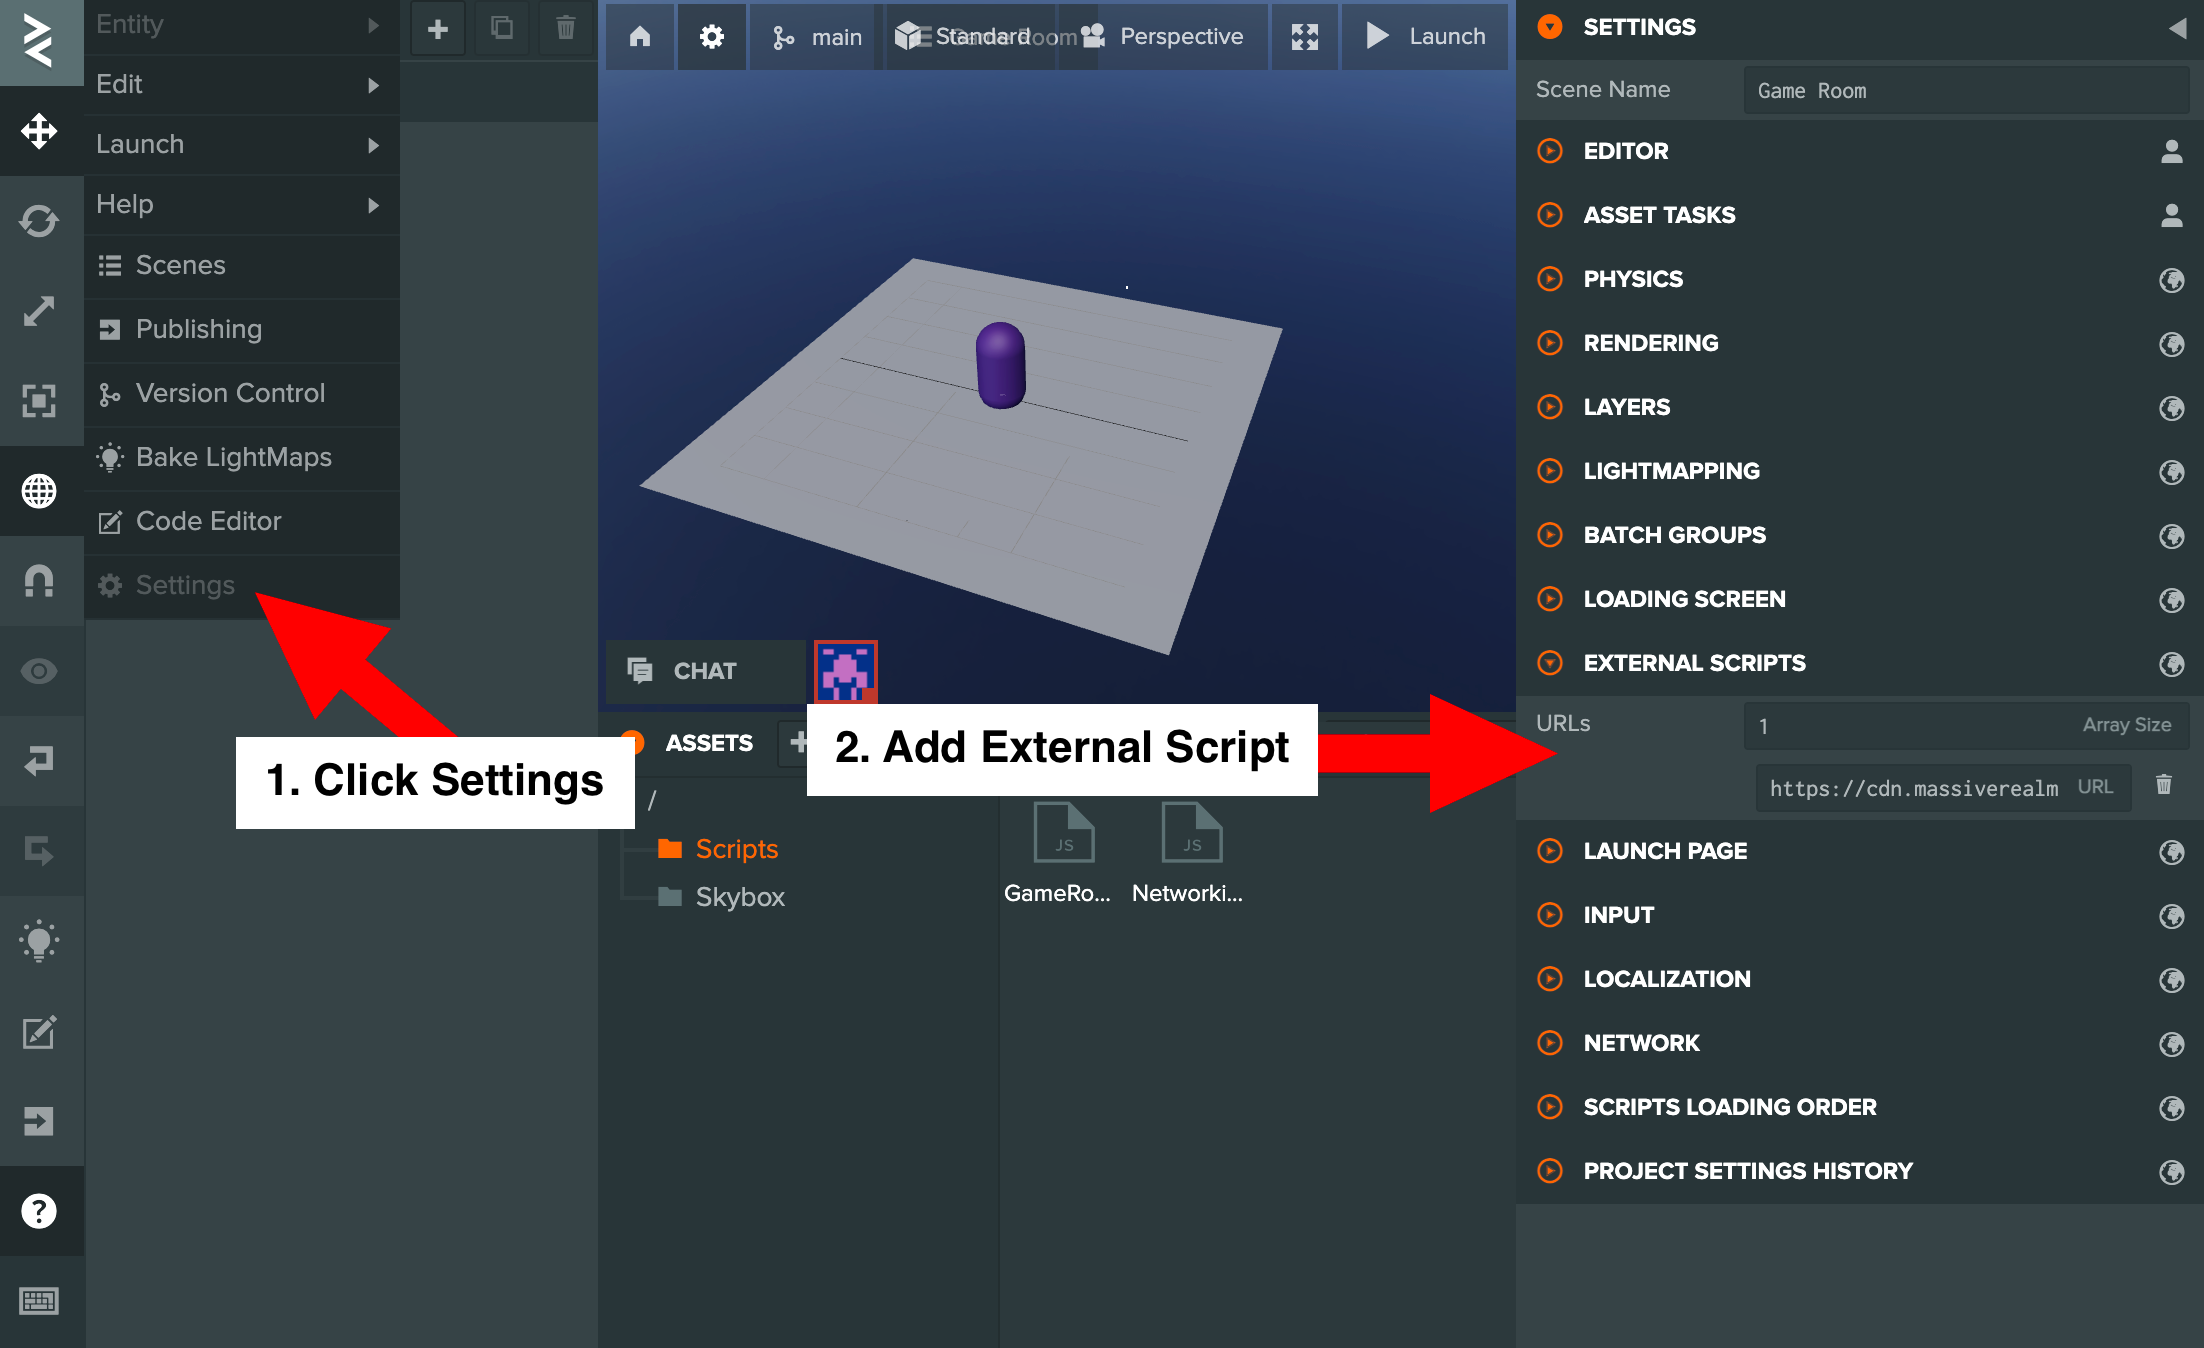
Networking Script
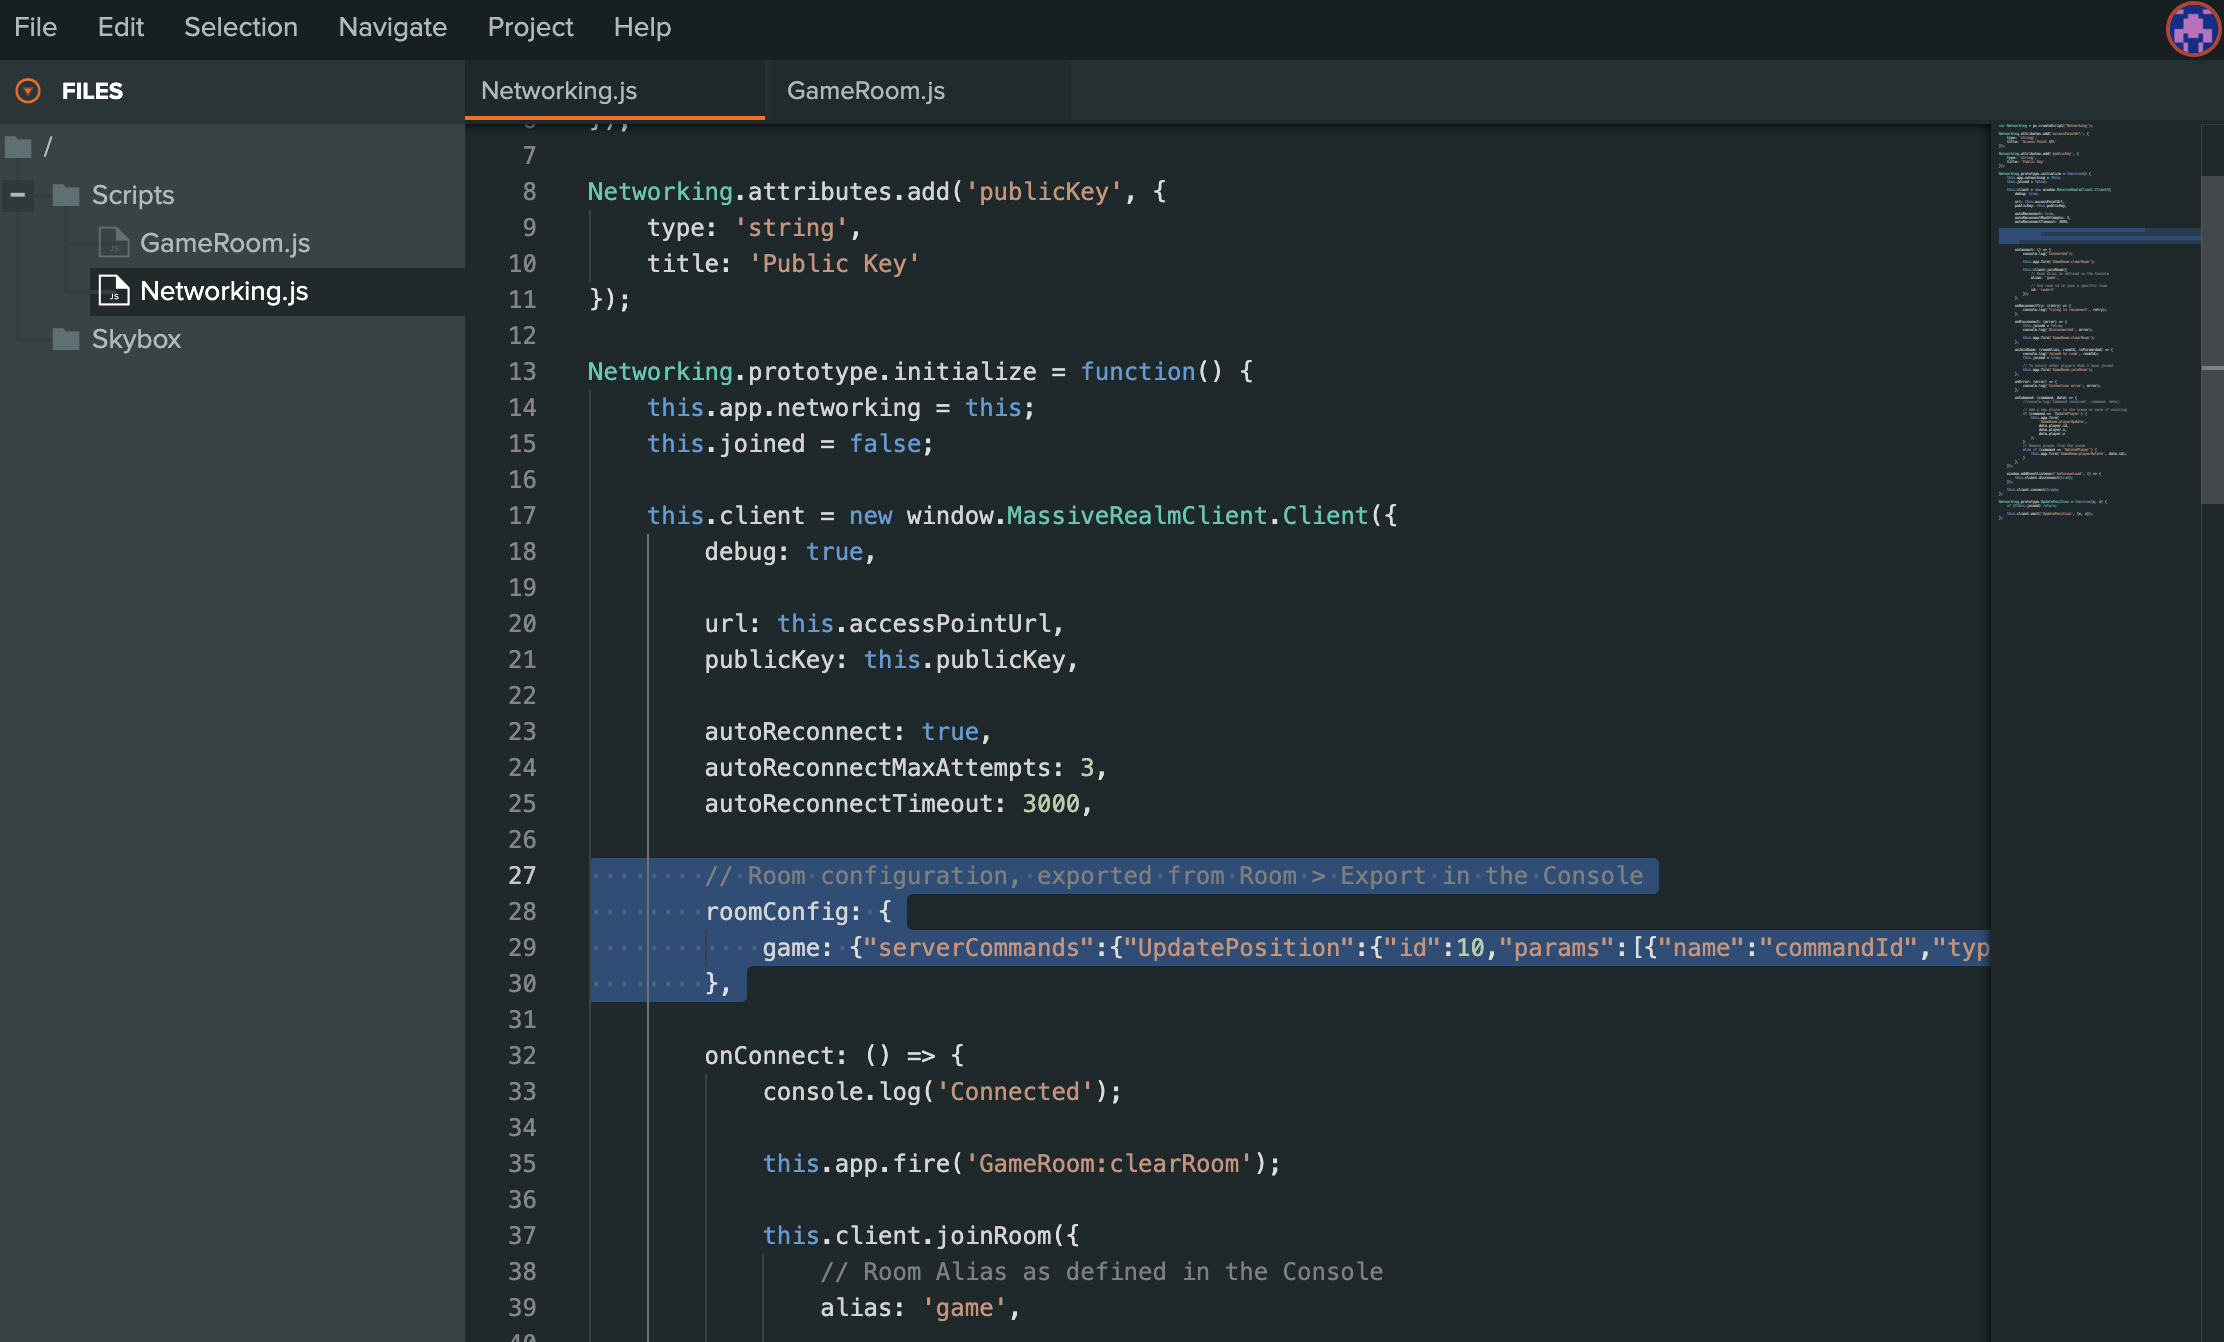
Create a new script in your PlayCanvas project called Networking.js.
Here is the example code:
var Networking = pc.createScript('Networking');
Networking.attributes.add('accessPointUrl', {
type: 'string',
title: 'Access Point URL'
});
Networking.attributes.add('publicKey', {
type: 'string',
title: 'Public Key'
});
Networking.prototype.initialize = function() {
this.app.networking = this;
this.joined = false;
this.client = new window.MassiveRealmClient.Client({
debug: true,
url: this.accessPointUrl,
publicKey: this.publicKey,
autoReconnect: true,
autoReconnectMaxAttempts: 3,
autoReconnectTimeout: 3000,
// Room configuration, exported from Room > Export in the Console
roomConfig: {
game: {"serverCommands":{"UpdatePosition":{"id":10,"params":[{"name":"commandId","type":"uint8"},{"name":"x","type":"float64"},{"name":"z","type":"float64"}]}},"clientCommands":{"DeletePlayer":{"id":10,"params":[{"name":"commandId","type":"uint8"},{"name":"id","type":"string8"}]},"UpdatePlayer":{"id":11,"params":[{"name":"commandId","type":"uint8"},{"name":"player","type":"model:Player","array_of":"model:Player"}]}},"models":{"Player":{"params":[{"name":"id","type":"string8"},{"name":"x","type":"float64"},{"name":"z","type":"float64"}]}}}
},
onConnect: () => {
console.log('Connected');
this.app.fire('GameRoom:clearRoom');
this.client.joinRoom({
// Room Alias as defined in the Console
alias: 'game',
// Use room id to join a specific room
id: 'room-1'
});
},
onReconnectTry: (retry) => {
console.log('Trying to reconnect', retry);
},
onDisconnect: (error) => {
this.joined = false;
console.log('Disconnected', error);
this.app.fire('GameRoom:clearRoom');
},
onJoinRoom: (roomAlias, roomId, isForwarded) => {
console.log('Joined to room', roomId);
this.joined = true;
// To notify other players that I have joined
this.app.fire('GameRoom:joinRoom');
},
onError: (error) => {
console.log('Connection error', error);
},
onCommand: (command, data) => {
console.log('Command received', command, data);
// Add a new player to the scene or move if existing
if (command == 'UpdatePlayer') {
this.app.fire(
'GameRoom:playerUpdate',
data.player.id,
data.player.x,
data.player.z
);
}
// Remove player from the scene
else if (command == 'DeletePlayer') {
this.app.fire('GameRoom:playerDelete', data.id);
}
},
});
window.addEventListener('beforeunload', () => {
this.client.disconnect(true);
});
this.client.connect(true);
};
Networking.prototype.UpdatePosition = function(x, z) {
if (!this.joined) return;
this.client.emit('UpdatePosition', {x, z});
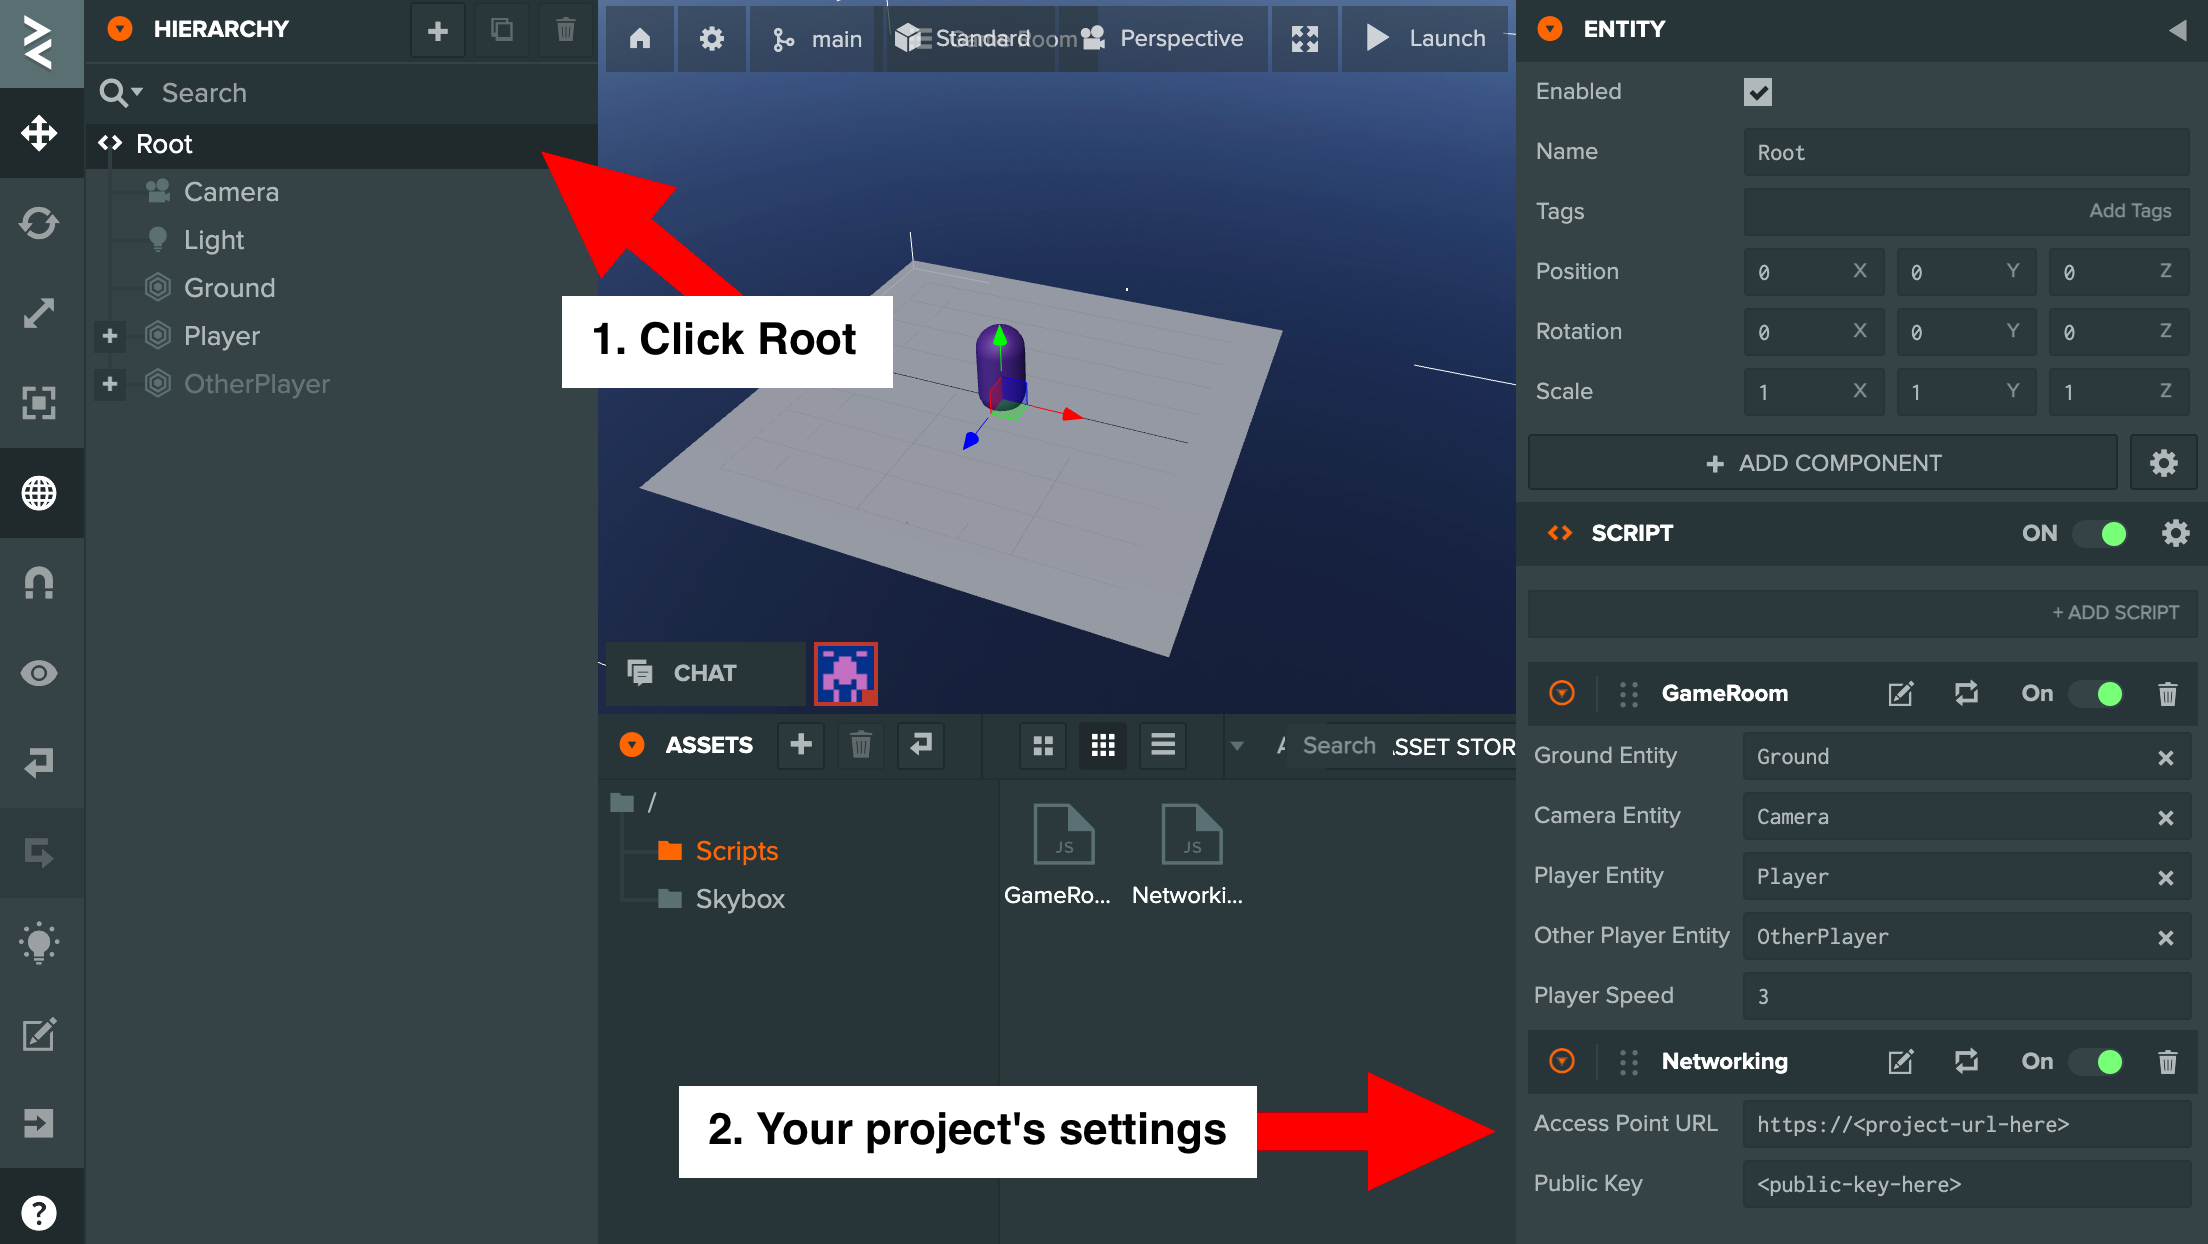
};Project Settings
Optimization Tip
Storing room settings on the client side may significantly reduce network traffic. This way, the client will not need to request the room settings each time it joins a room.
Navigate to the Rooms section and select the room you want to optimize. Then click on Export on the left side and copy the code.
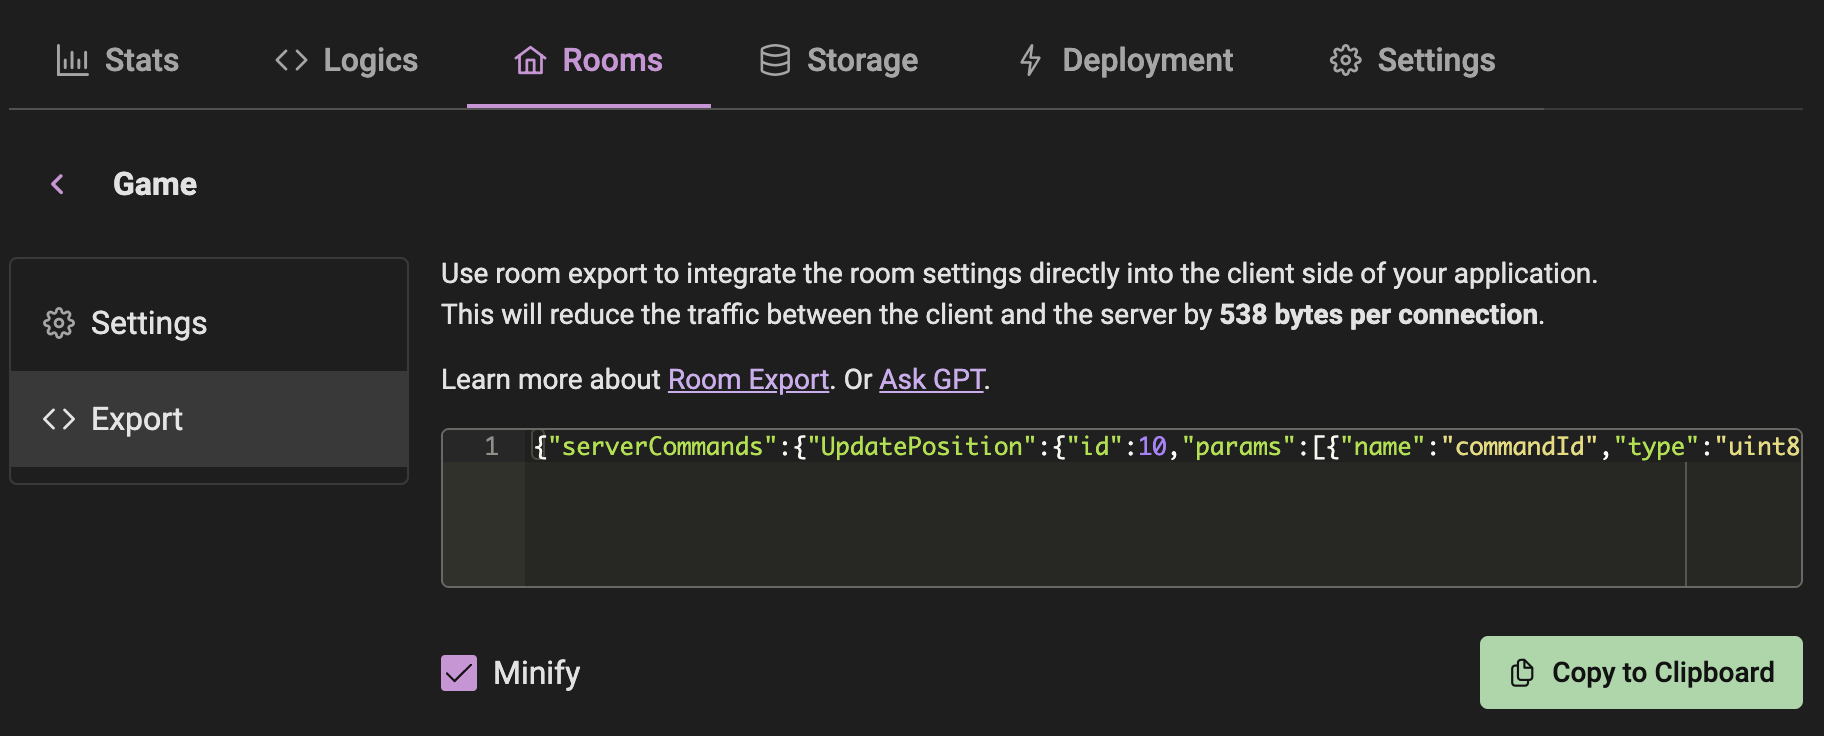
Paste that JSON into the client-side code, and you're done!
More Performance Tips.